
The Importance of Bleed in Graphic Design: Why It Matters for Print Perfection
When preparing designs for print, bleed in graphic design is one of the most crucial elements. Whether you’re creating business cards, flyers, brochures, or posters, understanding bleed ensures that your final print looks professional and free from unwanted white borders. In this guide, we’ll cover what bleed is, why it matters, and how to set it up correctly in your design software.
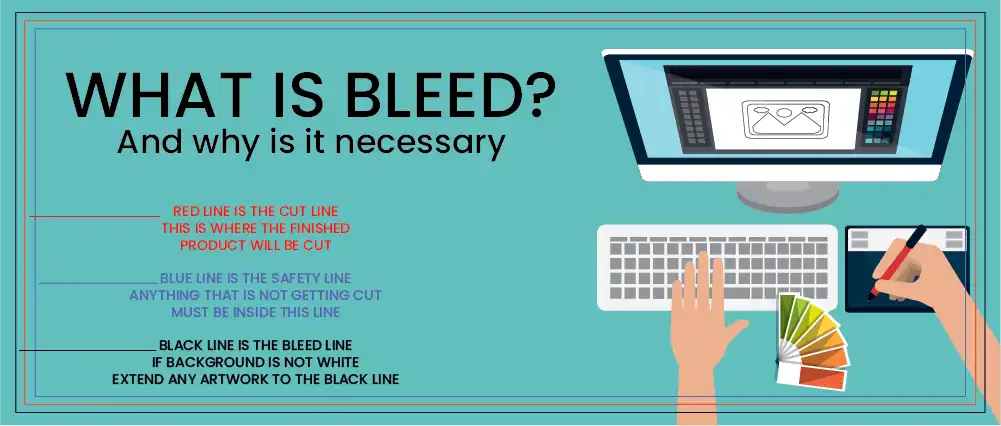
What Is Bleed in Printing?
In printing, bleed refers to the extra space around your design that extends beyond the trim line (the final cut size of your document). This margin prevents small cutting shifts from leaving thin white lines on the edges of your printed materials.
- Trim Line: The exact final size of the printed piece.
- Bleed Area: Typically 1/8 inch (0.125”) or 3mm added outside the trim line.
- Safe Zone: The area inside the trim line where important text, logos, and graphics should remain.
If you’ve ever asked, “What is bleed in printing and why do I need it?”—this is the answer: it ensures your print comes out looking clean, sharp, and professional.
Why Is Bleed Important in Graphic Design?
- Prevents White Borders
Without bleed, small trimming shifts can leave white edges around your design. Bleed eliminates this by extending backgrounds and images beyond the trim line. - Ensures Professional Quality
Proper bleed setup is an industry standard. Printers expect it, and clients notice the difference in the finished product. - Accounts for Cutting Variations
Even the best printing equipment has slight variances. Bleed ensures your design still looks perfect, even if the trim is slightly off. - Required by Most Print Shops
Many printers won’t even accept a file without bleed. Adding bleed saves time, prevents rejections, and ensures your design is print-ready.
How to Set Up Bleed in Your Design Software
Different design programs handle bleed setup differently, but the process is simple once you know how:
- Adobe Illustrator / InDesign: Set bleed in the “New Document” dialog (usually 0.125” or 3mm).
- Adobe Photoshop: Add extra space manually by increasing canvas size.
- Canva / Online Tools: Many offer built-in bleed guides you can enable.
- Exporting Files: Always save as PDF and check “Use Document Bleed Settings.”
Pro tip: Always confirm the required bleed size with your print provider before exporting.
Common Mistakes Designers Make with Bleed
- Forgetting to extend background colors or images beyond the trim line
- Placing text or logos too close to the edge (risking accidental cropping)
- Designing without bleed, then trying to add it at the end
- Exporting files without including bleed settings
Final Thoughts
Adding bleed to your design might feel like a small technical step, but it’s one of the most important parts of print-ready graphic design. Whether you’re preparing business cards, flyers, posters, or brochures, properly setting up bleed ensures a clean, polished, and professional result.
Remember: a design without bleed is a design at risk. Always build it into your workflow from the start.
If you are designing your own artwork, we can send you an approved template to layer your artwork on top of to assure everything lines up appropriately. Contact us prior to designing your artwork so there is less frustration later!
83 Responses